
 The world recently celebrated Vincent van Gogh’s birthday on March 30. He is one of the world’s greatest painters. I couldn’t resist the opportunity to celebrate by doing an art project inspired by him. So this week’s art project is a fun van Gogh reproduction. It’s not your typical reproduction, however, because let’s face it, we couldn’t begin to measure up to his greatness. It’s a fun experiment with a different medium. Crayons! It’s Van Gogh Melted Crayon art! You will love it.
 The supplies you will need are:
- Crayons
- Paper
- Aluminum Foil
- Cheese Grater
- Paints
- Paintbrushes
- Cups of water
- Old cupcake pan
If you have been doing any of the previous projects, you will most likely have everything that you need already. We used all of our broken crayons and then some. Everything is relatively inexpensive. I would just make sure that the paper is thick. If you wanted to try it, you could save the paper and cut off the back of an empty box of some sort for the canvas instead. Because we have all these supplies, this project didn’t cost us anything extra.
Introduce Vincent
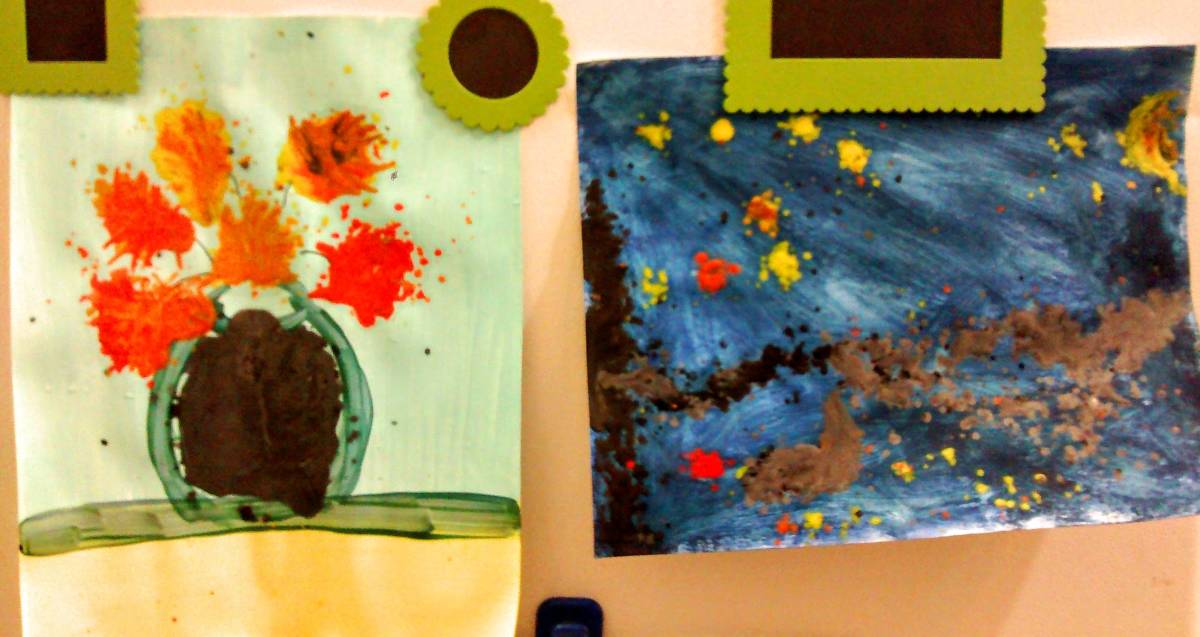
The very first thing you need to do here is introduce the legend — Vincent van Gogh. My  children were already familiar with him because we are Doctor Who fans in our home, and there is a truly beautiful episode about van Gogh that will force you to love him if you don’t already. We watched it again just to get ourselves in the proper frame of mind. Then we went to the glorious internet and watched some videos about his art. It turns out that YouTube can actually be useful sometimes! Then each child chose the piece they wanted to recreate. We chose Starry Night, Vase with Twelve Sunflowers, and Wheatfield with Crows. The only caution I would issue is that you should allot the proper amount of time here. You will easily and happily find yourself lost in this man’s great work. We found a quote of his that we loved. He said, “I feel there is nothing more truly artistic than to love people.” My children agreed with him.
Gather and Prepare
Usually I would tell you just to gather your supplies and cover your work surface. That is still important, but there is a bit more to do this time. You definitely need to choose what crayon  colors will be best for your recreation. Keep in mind, however, that you don’t have to make yours exact. This is meant to be fun and experimental. Then you will want to have your crayons grated before your start. It isn’t hard, but it is time consuming. In the interest of full disclosure, I should tell you that the worst part is peeling the wrappers off the crayons. On the bright side, I discovered that my children are extremely adept at this skill. It surprised me because I am forever telling them to not peel the wrappers off the crayons. Thank goodness their disobedience taught them something useful. Just grate the crayons onto the aluminum foil and keep them in separate piles. Choose the paint colors you will use on your background, and put them in the cupcake tin. Then fill your cups with water, give everyone their paper, and begin!
The Background
Now is when you paint the background of your piece. I had children that went crazy with all  sorts of different colors and others that did their best to make it similar to the original. Their interpretations were so original. The child that had originally intended to do the Wheatfield with Crows decided to merge that one with Starry Night and add bluebirds. I love it! Just go ahead and paint the backgrounds and let them dry a bit. It won’t take more than a couple of minutes, and it leaves you enough time to explain the next step if you are doing this with children.
Use the Crayon Shavings
This is where you have to put on your visionary hats. You have to sort of picture in your  mind what you want to create and sprinkle the shavings where you want them. A short word of warning here for you all. I did have a child that had a complete meltdown at this point. She didn’t believe it was possible to create what she wanted with melted wax. So if you have a child that is extremely precise, they will need a little coaching through this project. It’s also a good idea to use more than sprinkles of the shavings. The more you use, the better your melted puddle you get.
Melt It
After the shavings are all down you can place this in your preheated oven. After consulting Pinterest, the guru of all things crafty, I decided that most everyone agreed that 200 degrees Fahrenheit was the best temperature for melting crayons. You will only leave the art in there for about five minutes. When you remove it, be careful with the wax. It will be a warm liquid at this point.
Move and Modify
Once we pulled our art from the oven, everyone wanted to modify it a bit. They used the top end of the paintbrushes to spread the wax where they wanted it. You will need to move fast, because the wax cools quickly. On the bright side, if it isn’t what you want exactly you can put the art back in the oven to melt again! This was fun for everyone to experiment with the crayon wax. Much to my surprise, everyone was incredibly happy going back and forth with their paintings from the oven. They all loved moving the wax around.
Let It Cool
Once you are finished, let the painting cool on a flat surface for a few minutes. This will give the wax a chance to solidify completely. Then you can hang the art wherever you want it. Ours made it to the fridge this time. I am thinking of setting up a specific place to display their  art projects though because sometimes they aren’t ready to let go just because a new project was done.
I hope you enjoy doing this project. It really is fun to explore with a different and unusual medium every now and then, especially for children. The best part of this project, however, was the great time we had learning about this fantastic artist. He gave such hope to everyone. I will leave you with this quote of his. “I am still far from being what I want to be, but with God’s help I shall succeed.”
RELATED ARTICLES

Art Smart: finger painting fun

Art Smart: Doodle squares


