

Today we are making marbled paper cards. They are exceptionally beautiful. It’s a creative way to make art with shaving cream and food coloring. Your children will love it. No one can fail. If you have a child with special needs, I am positive that he or she will love this. The bonus is that you will get the thrill of watching them create.
Walt Whitman said, “The art of art, the glory of expression and the sunshine of the light of letters, is simplicity.” Every project presented here will be simple. The reason for that is also simple: I want you and your children to have enormous success. You don’t need a lot of complicated steps to express yourself. I imagine you do that pretty well without any guidance already. Art is just another form of expression, albeit a fun and creative one.
The thing about creation is that it can get a little messy. As a matter of fact, it can blow up in your face sometimes. That’s part of the excitement. Today’s creative endeavor ended in a disaster of monstrous proportions at my home. This brings me to the other purpose of me. Not only will I bring you ideas, I will blaze the trail for you. I will brave the dangers of the projects first so that I can guide you better.
 To make marbled paper cards, the first thing you want to do is gather your supplies. You can get everything incredibly cheaply and inexpensively. You shouldn’t spend more than a dollar on anything but the food coloring. I have had luck finding that at dollar stores too, though. These are what you will need:
—Shaving cream.
—Liquid food coloring.
—Popsicle sticks.
—Tin foil.
—Paper.
—Something to scrape the shaving cream off.
Get the cheapest shaving cream you can find. You don’t need anything fancy. If you have many children, grab many cans! Most likely you have many of these items on hand. The paper I used, however, is called mix media paper. I like it because it’s thicker and holds up better. I buy it in a big tablet and tear out what I need as the time comes. You can use this or any other paper you prefer.
Now, remember when I told you I blazed the trail for you and marked it? This is the first sign of danger you need to notice. If you have children with long hair, tie it back. As a matter of fact, you might consider shaving it off in case the ponytail breaks loose. (I’m kidding.) Do tie it back, though. Once everyone’s hair is secure, their clothing is covered, and your work surface is completely covered, you are ready to begin!
Tinfoil and shaving cream
Lay out a piece of tinfoil that will be large enough to cover the piece of paper you are using. Shake your can of shaving cream, and cover that tin foil! It smells great, and the children will love it. Mine remarked how much it smelled like their grandfather the entire time.
Food coloring and vision
 After the foil is covered in shaving cream, take the lids off of your food coloring and start drip-dropping onto the shaving cream. This is where their creativity really comes out, and you can see the differences between the children and yourself. I was appalled to see my children taking anywhere between five and eight colors and dropping them all over the shaving cream. I was certain it was going to turn into a disgusting ugly mess. I had one child choose only three colors and very methodically place her drops. I was sure hers would be the only usable product in the end. I was happily proven wrong.
 Swirl, swirl, swirl!

Once the dye is dropped, take the popsicle sticks and just start swirling. Let the children mix to whatever point they decide is marbled enough for them. Every one will have a different idea in mind. That’s one of the best parts of art: unique ideas and perspectives.
Paper down, paper up
 After the shaving cream has reached the desired marbled effect, take the piece of paper and place it down on the shaving cream. Be sure that the whole paper gets shaving cream on it. Then simply pull it off. The kids love this part because of all the multi-colored peaks and valleys.
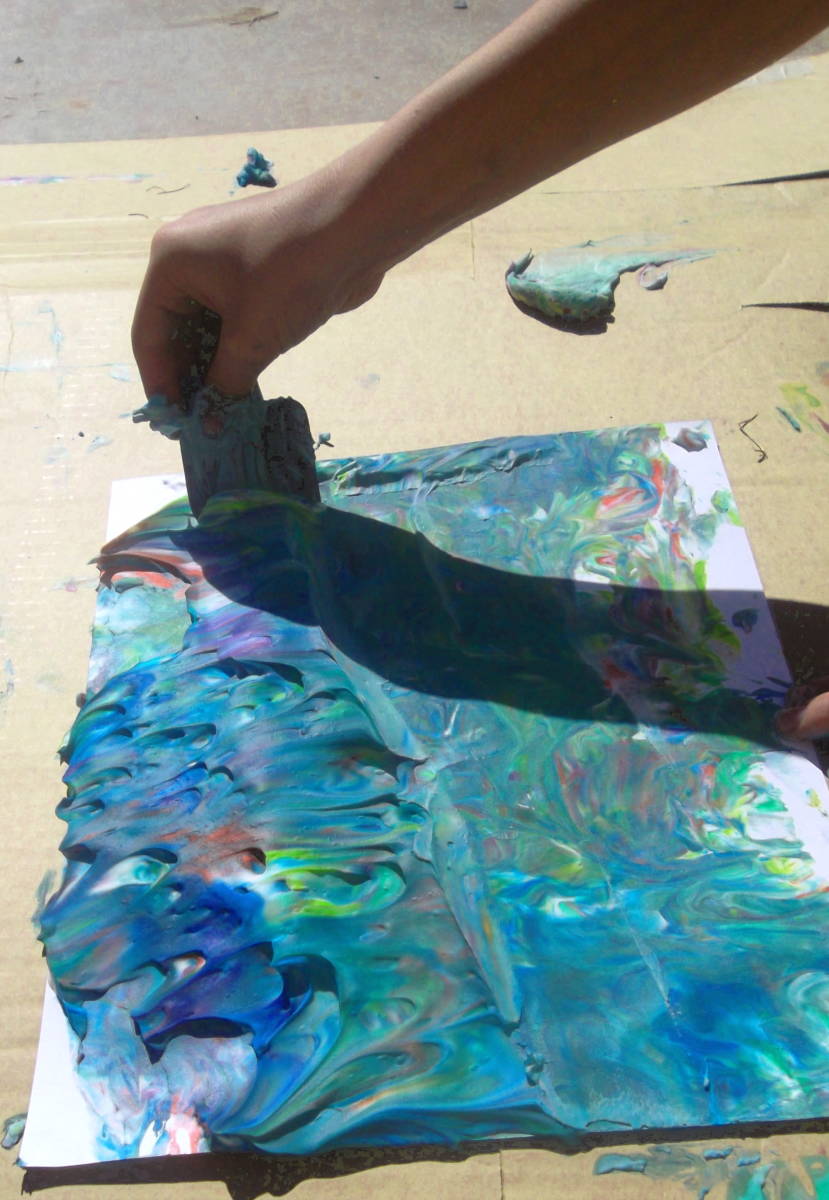
Scraping the shaving cream

Now is when you scrape off the shaving cream. You will need a place to do this. We did ours outside on a piece of cardboard. You could also do it in the sink. Wherever you do it, you must listen to this warning. Whatever you do, under no circumstances should you leave your child or children alone after scraping off the shaving cream. This was my mistake. I walked outside to find children shrieking and laughing, covered in dyed shaving cream. This meant their faces were dyed for two whole days. Be wise and heed my cautionary tale.
Drying and finishing
After you scrape off the shaving cream, let the paper dry for a few minutes. If you want to leave it as it is, that is fine. We prefer to use these beautiful marbled paper cards for birthday cards, thank-you cards, or any other cards. It makes it easy to have them on hand when the time comes, and everyone loves to  give them more than store-bought cards. If you are making cards, decide what size you want, and cut the paper to that size.
This project was incredibly fun for the whole family, even if though it ended in disaster. Remember the children that went crazy with the food coloring? Their marbled paper cards were surprisingly gorgeous. Art has a way of working itself out. When we give our children and ourselves the freedom to express and create, only good things happen. Have fun!


